*This post contains affiliate links to help me pay for fabric rehab*

Hey! Remember when I said I was going to take a break from testing? Yeah, me neither.

So I tested the new Itch to Stitch Lisbon Cardigan that released today. This is absolutely perfect for me as I'm a cold human that works in a large warehouse where I still have to dress professionally. So when I saw the style of this cardigan, I had to test it! What a great excuse to make more work clothes. :D

*If you haven't sewn an Itch to stitch pattern, you are in for a treat. The designer, Kennis, is a detail hound and you won't get through one of her patterns without learning something unless you've been a professional tailor for decades. Her patterns are very professional, yet completely approachable. If you want to test one out first, she always has the Lindy Petal Skirt for free here!* (Picture linked on sidebar)


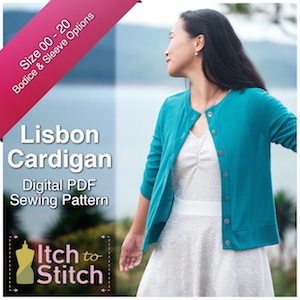
The Lisbon Cardigan features
-Long sleeves
-3/4 length sleeves
-Full length
-Cropped length
-No hemming, everything is banded!
-Sleeves not cut on fold
-All pieces are notched
-Directions where to interface and which type to use
-Layered printing
-Sizes 00-20
-Tips on Hong Kong finish for seams


I sewed a size 2 for the chest, 0 for the waist, and 4 for the hips according to the size chart and the fit is spot on. The sleeves are the perfect length where they just slide over your hand a tiny bit. The over all fit is slightly relaxed but still fitted if that makes any sense at all.


My buttons are done pretty well, but the spacing is just slightly off on the actual buttons! It will get better with practice, but see that small pucker? Also, my bottom button is way too close to the edge. I only noticed after the button holes were done. Oh well, all part of the process. The next one will be even better. (You know it's a garment I like if I have a next one planned already)


I sewed this up in sweater knit that I bought from Sincerely Rylee last year in one of her mystery boxes that I don't think she does anymore. However, I got a great deal on lots of sweater knits and this was absolutely perfect, however I'm not sure of the exact fiber contents. If I wanted something a little lighter I would probably choose a rayon spandex blend or a cotton Lycra. Maybe this would be cute in a Ponte, too? So many things to try. I'd also like to do a V neck hack. (I'm always trying to push it... I don't do well in matronly clothing. :P) I do feel just a little classy in this outfit though. :D


Don't forget, the Lisbon Cardigan is on sale for 20% off right now! :)

Details
Fabric - aprox. $4 / yard for 2 yards = $8
Notions
Interfacing = $2
Buttons $3
Thread = $.50
Estimated total cost = $25.50

Itch to Stitch Lisbon Ad 300 x 300

I did receive the pattern for free in exchange for testing it before it was released.
Folks, spring is here and I am so happy! It's actually raining as I write this but I was blessed with a gorgeous week, so I'm not even complaining. My friend Emma rushed out with me for a quick photo shoot and helped me capture these awesome photos, thank you Emma! <3 

So I am back to testing! For some reason I can't take a break - I see a cute tester call and I jump at the chance to test. I enjoy the process and I enjoy a deadline. It helps keep me motivated. Plus I'm more likely to blog about it if I tested. I can't tell you the amount of "dead" items that I sewed and never told anyone about. Pictures are so hard to get sometimes!


This is the latest release from Lil Luxe Collection, the Women's Starlight City Dress. Previously it was a children's pattern company with very contemporary designs but LLC has been branching out into Women's wear and I'm very excited! I love the aesthetic of LLC and am excited to have some of my favorite designs made into women's patterns.


The Starlight City dress has a few fun options.

-Bodycon dress (my version)
-Gathered waist dress
-Gathered skirt and top separates
-Bodycon skirt and top separates
-Knee length or maxi gathered skirt
-Short, 3/4, or long sleeves


I sewed the XS based off of my bust and waist measurements and the fit is spot on for a bodycon dress. The waist has an interesting detail. The elastic casing is actually a "flap" that can flip up or down. it stays in place in the "flipped up" position because the elastic and negative ease keep it in place. This is a new to me sewing technique but worked out very well because there is no stress on the waist seam from the skirt. I'll try to get some detailed pics to demonstrate what I'm talking about and update this post. But it's comfortable and keeps the waist from being pulled down and sagging from the weight of the skirt portion.


Ok. Let's get to the important part. THE BACKKKKK! Do you love this as much as I do? Err Mer Gerd. I adore the back of this dress. Cut outs are very "in" right now and this dress is just perfection in the back. Also, if you'll notice my bra. No? You didn't notice my bra? Exactly. 

Jessica and Angie did a ton of leg work to make sure that your REGULAR bra was concealed in this dress. No special bra or duct tape to wear this masterpiece. That's actually not a huge concern for me, but for the bigger chested ladies, it's a total win. :) The twist in the back mixed with the deep V and no special bra really makes this a fun and unique wardrobe piece. It will be great for all those Spring and Summer weddings coming up!


All of my comments on the construction of this dress are based upon the testing version and I'm not sure of the changes, if any, that have been made in the final pattern. The version I sewed was the most updated version of the tester pattern. 
  • The pattern features layers, but you have to trim the pages. 
  • There are separate bodices for petite and regular torso lengths. 
  • The instructions are accompanied by illustrations that are very clear.
  • The bodice is fully lined, however the side seams are not enclosed. (You can easily enclose them, but the instructions direct you otherwise)
  • There are grainline markings
  • There are notches to match pattern pieces
  • The sleeves are not cut on the fold


I tossed on a thrift store men's shirt for a more casual "me" look and while the fiance disagrees, I think it's cute. I feel like a rocker or something. -_-
P.S. Is there a way to wear bright red lipstick and not look like a hooker? Especially at 3pm with randos jogging by. I totally fit in. Oh, the awkward things I do.


I definitely DID crawl through 1,000,000 spiders for these train photos. So, relevant or not, I'm posting them. 


Overall the dress was constructed quickly. The waistband instructions caught me off guard for moment but I was able figure it out. It was just an unexpected "new to me" technique but once I read it over, I was able to construct the rest without issue. I'm SO happy they made it where you get the sexy V and cut out but without the hassle of finding a special bra or going braless. Next I'll definitely be sewing the gathered skirt version. That is a little more my pace and I already have fabric purchased for it! :D Because lawd knows that the one thing I need MORE of in my closet is Spring dresses that are inappropriate for work.


Details

Pattern LLC Starlight City Dress $14 (I received the pattern free for testing)
Fabric Black and Patterned knit from Joann's $15
Notions Elastic and thread $.50

Estimated total cost: $29.50

I will be sewing this dress again! The twisted back bodice is so cute and on trend. I need at least one more. 
Make sure that you get the dress while it's still on sale. It's marked down to $9.80 through the week instead of the standard $14.

If you make the dress, make sure you #starlightcitywomens on instagram!
Hello Ladies! Glad you came back to check and see who won the awesome prizes offered by our wonderful sponsors!

Let's Jump right in!

Felicia Balezentes
$25 to BWD Fabrics

Jody 'Rice' Kappas
$25 to Cali Fabrics

Ambere Hartman
Choice of 4 yards to Raspberry Creek Fabrics

Sherrie Mullen
Centerfield Raglan by Greenstyle Creations

Sheila Hlushak
Rainier Raglan by Peek-a-Boo Patterns

Latoya Matthew
Romance Raglan by Wild Blume 

Brooke Church 
Zoe Raglan by Liola Patterns

Shandra Mueller
Jalie Raglan

Lesley Rosas
High Low Raglan by Jamie Christina

Rachel McDaniel
Geneva Raglan by Named

I will be passing each of your emails along to the appropriate people to contact you for your prize! Congratulations and thank you for following along during our raglan extravaganza.

BIG, HUGE thanks to all of our sponsors! The designers who donated their patterns for us to sew, those who offered coupons for our readers, those who offered patterns to readers, and of course the three amazing fabrics sponsors! 

We only contacted shops who's fabric we've used before and I'll tell you, all three of the shops carry AWESOME fabric. I can't wait to see the raglans you all sew up with your prizes.  
Hello from Sunny Washington! (Said no one ever.) Don't let these pictures fool you, I was freezing my butt off.

I'm bringing you something fun and new today, another bohemian beauty design from Mandalynn of Striped Swallow Designs. She recently came out with a girl's version of the Desert Breeze and I snatched it up right away for my nonexistent babies nieces. I absolutely adore the style of this top, it's going to be perfect for "Summer." (If that's a thing that happens here.) 


The Women's Desert Breeze includes several options.

-Flutter sleeves with cutout 
-Straight sleeves with cutout
-Flutter sleeves with cut out and elastic instead of binding
-Gathered waist dress
-Loose swing dress
-Loose swing top

-Fitted top (This will be an add on in the near future. A little birdie told me that it will be *free* to members of the Striped Swallow Designs Sewing Group! So join early and get first access to the add on slim fit top.)


I chose the slim fit with flutter sleeves and binding around the sleeves. Based off of full and upper bust measurements I sewed an XS and it fits like a glove. Full disclosure ... I feel like an angel. 
The construction of the Desert Breeze is ... a breeze. Everything comes together like a dream and it's relatively quick, too.

If you haven't used a Striped Swallow Design pattern before, you're in for a treat. Her patterns are laid out in a super pleasing manor and she thinks of the little things. (like putting the S/A on each page - so if you forget, which you know you probably will, you don't have to flip through 20 pages to find it.) She walks you through each step with detailed photos and at the end, you probably can't believe you finished with such an ace looking product. 
The binding instructions are great, too! Just look at how pretty my binding turned out in the picture above. I impressed myself. ;)
AND! The pattern pieces are layered so I was able to print just my size. #thankyoulawd

*Side note, I used a straight stitch for the binding and it turned out great! If anyone is like me, you might try to decide on stretch or straight stitch... we'll fret no more, straight works fine for this top on the binding.*


I did lengthen the Desert Breeze by 2". There are no lengthen and shorten lines, but it's pretty easy to do yourself. I just found the thinnest point on the front and back and cut and added 2" in between the pieces. If you are around my height 5'6", I would suggest adding a little length unless you are comfortable in shorter tops. Additionally, I haven't hemmed the sleeves or the bottom, so it's a little longer than it will be once I hem them!

The knit is a basic rayon spandex blend from Joann's. It's very drapey and buttery soft. I've always been a cotton lycra fan, but man, rayon has been winning me over lately. It cascades in a way that the cotton doesn't. I'm thankful that I couldn't find a print that I liked. I need to sew in more solids, this top feels so elegant in a cream. 


Thanks to my awesome fiance for the pictures (and necklace). I feel very delicate. :)

The Women's Desert Breeze is releasing today 03/28/2016! You can find it at StripedSwallowDesigns.com Women's Desert Breeze and Bundle and you can get it on sale with code "BREEZE" for 25% off (it's on the entire store, too!) I promise that it will be a Summer staple :D 

Details
Pattern Women's Desert Breeze $12
Fabric rayon spandex from Joann's $16 for 2 yards (with leftovers)
Notions thread $0.50

Total estimated cost $28.50

However I did receive the pattern free of charge in exchange for testing my size and I didn't use 2 yards of fabric. I probably have 3/4 yard left over.
Wow. What a long journey of many, many, many raglans it has been! First I want to take a second to say thank you to a couple of people, Tibeca of Sewing by Ti was awesome and did lots of work to make sure that we had the designers providing us the patterns so we wouldn't go broke doing this project. Also, she never once made me feel bad when my raglan Thursday's turned into Raglan Fridays. Thanks Ti. You're the best.

Secondly, I want to thank all the lovely ladies who offered their patterns up to be review, compared, and talked about! You all are awesome and I know that you've probably helped more than a few people find their perfect raglan!

Last, but certainly not least, I want to thank our Awesome fabric sponsors, Raspberry Creek Fabrics, BWD Fabrics, and Cali Fabrics! We've got $50 in gift certificates and 4 yards of fantastic cotton Lycra to give away, as well as a lot of raglan patterns to give away, too!

-------------------------------------------------------------------------------------------------------------------------
I'm going to take a minute to do a few "awards" of sorts. 

Best Size Range
This undoubtedly has to go to Jalie. They offer 12 months to women's 22! Plus you get a tank and a raglan pattern. :D


Best Value is a tie!

Sleeves 4
Hems 2
Elbow Patches 2
Hood 1
Necklines 3
Ruching on sides or standard 2
196 options for $14 = $0.07 per option


Patterns for Pirates Slim Fit or Regular Raglan + Add on Pack $17
Sleeves 3
Hems 3
Elbow patches 2
Hoods 2
Necklines 6
Pockets / Pouch / None 3
256 options for $17 = $0.07 per option


Most Likely to Sew Again
Here is where I show you how terrible I am at making decisions, but I have reasons for all three.
1. Greenstyle Centerfield Raglan - I want to make one in nylon lycra with a hood for workout!
2. Patterns for Pirates Slim Fit Raglan because it's slender enough to be completely my style
3. Hey June Lane Raglan. I'm enthusiastic to try her updated version of the lane that she just offered for free to everyone that has purchased.  

Best for Taller Girls
By taller I mean 5'6" ... I had to make no length adjustments to the Rainier raglan! as well as no length adjustments to the P4P Slim fit with the curved hem.


What a fun experience this has been! Now I'd love to see your renditions, too! Tibeca has a link party up on her blog so please feel free to add any raglan you've sewn to the link party. 

Below you can find all the details for the fabric and pattern giveaway! This runs from 03/25 - 03/28 so get your entries in soon!

I hope you enjoyed this series! Tell me what type of series you'd be interested in seeing next in the comments.

May the odds be ever in your favor!
a Rafflecopter giveaway
Hi friends - something a little different today. I don't know if you know, but I have approximately 1,000,000 nieces and nephews and sometimes, just sometimes, when I'm not feeling lazy, I sew for them. :) 

I thought I'd start sharing some of those. You may be interested, you may not. (sorry) but I always love seeing new renditions of my favorite patterns.

I sewed two patterns from two designers for my littlest niece A. She's 5 months now and just cute as can be. If I get some pics of her in it, i'll update. ^^


The hat is the Trendy Beanie from Puperita Patterns. Annalisa is the designer behind Puperita and it's one of my favorite brands. All of her patterns show attention to detail and they turn out like the pictures. She teaches great techniques and many of her garments are fully lined. I can't tell you enough how great her patterns come together. Plus, she's super active in the Puperita Facebook group - so if you need any help, she or one of the admins will walk you though anything you need assistance with.

This hat is no exception. It's a super quick sew and comes out very cute! Reminds me of the nursery rhyme Winken, Blinken, and Nod.


The pants are the classic Maxaloones from Max and Meena.  I have only sewed one of their patterns (this one and several times.) but the instructions and photographs are very easy to follow! M&M are popular for this pattern! Practically everyone has made it or has seen it at a craft fair. 

If you're not familiar, they're "grow with me pants." The pattern includes sizes NB-5y.  Each size fits a range of ages. The one I sewed will fit from 6 months to 3 years. The legs and waistband extend to allow for growth. The bum area fits cloth or disposable diapers so even as the kid ages, there is room for a growing butt / legs / chunky baby thighs. (I'm baby shaming now.) Plus, the contrast butt is just too cute. 


Details

Patterns 
Fabric
Birch organics interlock knit - 2 yards+shipping - $25
Hat tie - cotton/lycra scraps - free
Notions 
Thread $.50


Here it is girls! My final raglan review... maybe forever. I have enough raglans now, haha. :) That means next week is our comparison post and fabric raffle. Make sure you check out Ti's final blog post, too. 


For my final piece, I sewed up the CKC Heather's Raglan. This shirt pattern has the option to to add ruffles to the shoulder and hemline, or to leave it plain like I've done. It sewed up similar to most raglans. Pretty direct and painless. :)


The one thing that stood out to me was the sleeve installation. Many traditional sleeves are set in when constructing a shirt, but every raglan shirt I've sewn, I've attached the sleeve before sewing the sides. This pattern had me attach sleeves in the round which I found a little awkward while the raglan had no sleeves / neckband. I could easily have attached the sleeve to the front and rear before sewing the sides, but in the interest of actually testing the pattern, I sewed then in the round. Also, as a beginner, you may not know that attaching flat is an option!

The may have you attach in the round to help keep the shoulder ruffles evenly disbursed if you choose that option, but I chose the regular version. 


Something cool about CKC is this pattern offered layerd printing, which is new to my knowledge for this brand. The other patterns I own by CKC don't have that option. Layers are always appreciated! Also, the front and back are the same piece with different necklines, so you cut the back fabric, then remove the extra neckline, then cut your front fabric. It makes the paper piecing a breeze because there are only a handful of pieces to glue together.

I liked the length without any modifications, though I feel the sleeves were a little loose when compared to the body of the raglan. In addition, the armpit area rode up a little, which I've noticed is common with Raglan shirts. However, this is the only raglan I tested that the sleeve is cut on the fold.

I chose to sew the plain version instead of the ruffles. However, if you choose to do the ruffles, they do provide a measurement chart for those and the neckband so you're not printing a bunch of rectangles.


Who should sew the CKC Heather Raglan? 
Anyone who wants to use the ruffles that the pattern offers and anyone who if familiar with CKC patterns! Or anyone who wants to match their daughter as they have a kid's Heather, too!

My final Raglan is cute a comfy! You can purchase the Heather Raglan here! Make sure you check back next week to see the round up and enter the fabric giveaway.

Sizes
XS-XL
Printable pattern pages/copy shop version
No
Skill Level
Intermediate
Measurements for Rectangles
Yes
Line Drawings
No
Size made
Small 34-27-37
Options choosen
Regular, no ruffles
Fabric Requirement for your size
3/4 yard bodice
1/2 sleeves
Measurement Chart
Yes
Cutting Instructions
Yes
Pattern Printing Layout
No
Cutting Layout
No
Suggested Fabrics
Knits
Layer Printing Option
No
Neck Line Options
Ruffles or plain
Sleeve Options
Long, 3/4, short sleeve
Hem Options
Straight
Color Blocking
No
Seam Allowance
1/2"
Hem Allowance
1/2"
Separate add-on pack
None
Fit
Slim
Easy to read instructions
Yes
Drawing or photograph instructions
No


It's Monday! I've got some good news for you ladies on the 9-5. Itch to Stitch came out with a new collection today and all the pieces are perfect for work! You can see the entire collection here. I tested the Zamora Blouse and I'll share some thoughts with you below and a million pictures. 


The Zamora Blouse is a deep cut Pussy Bow blouse with pin tucks and darts galore. It features gently gathered sleeves and cuffs, waist and bust darts, curved hem, and staggered pin tucks down the front. The buttons on the front are fully functioning because this is a fitted blouse. You may be able to slip it over your head, but most likely not. The design is fantastic and totally my aesthetic. It's slim fitted and low cut but still work appropriate. That's a win on all accounts for me. :) 


Here's a close up of the pin tucks on the front. There are 4 on each side. Pin tucks are a labor of love. But when treated with patience, damn. They look so nice! The instructions on this part are fantastic if you've never sewn them before. Kennis explains it very well! The top piece is staggered for each tuck and each fold lines up perfect after all the tucks are sewn in place.


I did struggle with the waist darts. I've sewn darts before but every dart I've sewn has been on the edge of the fabric in some capacity. The waist darts on the front and back are in the middle of the fabric which was a little more fiddly, but it really helped to create a fitted blouse and was totally worth the struggle. (Plus, great practice! I love getting new skills under my belt.)


I blended sizes to create my blouse. The pattern comes with sizes 00-20. Based on my measurements, I sewed a size 0 for the waist 27" - size 2 for the bust 34" - and size 4 for the hips 37", and a B cup. Blending these sizes was easy because the Zamora features layers, so I just printed the three sizes I needed and gradually blended them together as I cut the paper out. The fit feels fantastic. There are some visible drag lines under my bust. Unfortunately I'm not experienced enough to know what caused this or how I can fix it. So I'll be doing some research!


The back has a small pleat and two darts at the waist. I meant to photograph the inside of my blouse, too. Unfortunately I forgot but I did do french seams, so the inside is pretty neat, too.


Note to self: Read. This pattern comes with cup sizes, so if you are a C cup and a size 6, you'll sew a different size than if you're a B cup and a size 6. It's pretty fantastic and helps to customize your fit without a ton of modifications you have to do yourself. All this being said - there a lot of pages to print that you don't need (you only need your size / cup size) Kennis provides a print chart on page 5 to tell you what pages you need to print according to your cup size, then you can choose to use the layers function and only print your specific size.
Can you guess already? Yep. I printed every page and pieced them all together before I realized that I was taping together a D cup. So not my chest size. :) So, check out page 5 before you print! You're welcome. :)


This is my "I'll totally answer the phone and do professional office work, but I'll also probably wink at you." Outfit. It got second glances from the fiance... which is saying something if he's immersed in League of Legends. 


Here's my lay flat picture. So adorable! Can I confess that I actually hate this fabric. I love the buttons, but the fabric is bleh. Blue is just not my color, yet somehow I own a TON of blue. Fabric aside, I love my blouse. I will be making more for work! I actually wore it for work today and got a ton of compliments. 


This is a little less test related but more ... "I got my new sewing machine!!!" related. JUST LOOK AT THESE BUTTON HOLES! HOLY CRAP! It was such a breeze to sew these button holes. No muss, no fuss. I even did extra buttons because I picked up a smaller size. (Hey, they matched so well!) That's pretty unheard of though, amirite? Extra button holes by choice? Yes, I have lost my mind. Directly into my Janome Skyline S7.

 YAAASSSS!

I loved sewing the Zamora blouse. It was a total labor of love. I believe I spend about 6 hours on this blouse alone. I opted to do french seams as my fabric was so prone to fray. All the darts and pin tucks took time, however - wasn't it totally worth it? I am super proud of this blouse and I can't wait to have a collection of them. I believe Kennis puts a ton of work into her patterns to make them impeccable.
There is everything you'd expect in a professional pattern, grain lines, notches, (I believe it's called trueing? When all the folds for the pin tucks make a straight line when they're sewn?), cup sizes, encased neckline and cuffs, drawn instructions, clear directions, layer printing, printing layout, tips for new techniques, and a classic design.

If you are interested in the Zamora Blouse, you can get it here.
The new releases and entire shop is on sale through March 13th, 2016 with code 4releases

Details
Fabric: Clearance at Hobby Lobby Fall 2014. 2 yards $12
Notions
Buttons: $.99
Thread: $.50

Estimated total cost $25.49

I received the Zamora Blouse pattern for free in exchange for testing it.