Showing posts with label Top. Show all posts
Summer is almost here and I have been spending my non work days basking in the sunshine with my Zoes. Sister Zoe and Baby Zoe! Washington is getting hotter and this is the perfect summer top to wear out and about to keep cool. 

This is the newest release from Striped Swallow Designs - The Women's Daybreak Top. It comes with a few fun options to mix up your summer attire and keep things fun. Below I have sewed the V-Neck, High Hip, Front Tie Option. 


I tested this pattern before it's release and it was really quick and easy. I really liked that I was able to use my sewing machine while making this. I end up feeling guilty when I only use my serger. Lol my sewing machine is so nice and hardly gets used!


The Daybreak features
-Faux Button Placket
-V-Neck or Scoop Neck
-Halter or Tank Options
-High Hip or Crop Top
-Tie or No Tie

All Striped Swallow Designs patterns have layers, A0 printing options, and no trim pages. <3


I was ecstatic to test this top because I recently fell just below my pre pregnancy weight and I am so ready and excited to be wearing normal fashion again. I especially love that this top has a faux button placket. My buttons blend in *too* well but it's a really fun detail. This faux placket matches a RTW top I have had for awhile now and kept saying "I need to recreate that." Mandalynn is in my head. :P


One quick pro tip: Pay attention to the fold lines on the pattern while making this garment. I made the mistake of ASSuming that it was on the center fold, (which looking back makes 0 sense!) and I had to pick a whole row of stitches. Boo. Mark your pattern pieces, people!


I hope you are going to join me in getting ready for summer by sewing up some cute warm weather clothing. The Daybreak is on sale through Friday 5/10/19 with code DAYBREAK. Here's a link to the (Not an affiliate link.)

Since the beginning of the year, I have been on a clothing buying hiatus. My New Year's Resolution was to not purchase any clothing in 2018. It's all been easy up until the point I realized I need work clothing. Have I mentioned I work all the time? Yep. Three 11 hours shifts, one 10 hour shift, and one 7 hour shift. It's outrageous. Some how I have more "fun" clothing than I do work clothes. I'm trying to change that ... at a snail's pace. -_-

I picked up the newish Halla Madeleine Cowl neck top as it's completely work appropriate and it looked like a simple sew, and it's flattering for my small *ahemm* bust. lol I paired this pattern with the new ITY line released by Surge Fabric Shop! God, I love this fabric. The color isn't something I normally go for, but it's so pretty! My husband has given me no less than five compliments on it. :P 


I chose the short sleeved ruched version of this top. Perfect for summer, and especially perfect with this stunning coral color. 


I sewed size 2/4 graded to 6/8 at the waist per my measurements. This is a standard adjustment on Halla patterns for me. I'm a little less curvy and than my husband likes to pretend. Hahaha the measurements don't like like friends do!


As far as the pattern goes, it was pretty easy to follow. I had a splitting migraine, so I'm wondering if all my complaints are due to the headache? I'll be making more so I'll update! 
1. I found it hard to find the back neckline chart. Turns out it's on the actual pattern piece. We'll chalk that one up to the headache. 
2. The order of the instructions confused me. It directed you on how to make the pleats first. I didn't understand that this was a step to refer back to after you begin constructing whichever style you chose, ie. ruched, short sleeved, etc. Then when the pleat part comes up, refer back to the beginning. 
Regardless, headache and all, I managed to get it done in 3.5 hours with only a small 20 minute nap and stopping to eat dinner. lol 


Despite the two small issues, I can't wait to make a few more of these! I already have another shipment of fabric on the way lol. Also, once you've made something once, things usually go smoother the following time around. 

This color and the other ITY colorways over at Surge Fabric Shop are gorgeous! Make sure you grab some before they sell out! It would make a wonderful dressing robe, MRT dress, culottes, or a cowl neck. ;)


This post contains affiliate links to support my Taco Tuesday addiction.

I keep talking about how I need more work clothes. I work all the time. yet here I am sewing up a gorgeous lace back tank. *Sigh* When will I learn?

I purchased the Marbella Tank during a sale on New Horizons patterns sometime this past spring and it has sat printed on my sewing floor for weeks and weeks. When I made my most recent purchase from Surge fabric shop I realized that Kayla still had some Marbella kits in stock so I snagged one. The match is perfection. I love all the laces that Surge Fabric Shop carries. 


The pattern is quick and easy and I love that there is no binding or facing or anything fancy. Just turn under the edges and coverstitch or hem! The top fits great and I love the back to show off that gorgeous lace! The only thing I wonder is HOW do people get away with not showing their bra straps? I'll be honest, I'm not one to try to hide my straps all the time, really only for photos, but I don't know how others do it. Strapless bras do not work for my body. Regardless, this pic below is in true form and it's how I really wear my tank. Maybe I'll be more sophisticated as I age. :P


The cream fabric is my favorite fabric, Modal in the cream color. It is slightly see through so I just tossed a tiny cami underneath to hide the FRONT of my bra. (See, I do have *Some* class).

The Marbella Kits are no longer in stock on the Surge Fabric Shop site, but all the individual materials are and I've linked them above!

If you haven't made the Marbella from New Horizons Designs I encourage you to do so! It's quick, easy, and looks very off the rack. Check out Surge Fabric Shop for awesome laces to dress up this tank, too. I need a handful for this summer.... but maybe I'll try to get some work clothes in first. 

Details:
Something strange happened yesterday in Washington. The sun came out. I don't know whether to squint or hide or curl up like a cat under the rays indoors... so naturally, I did the last option. I also managed to snag some pictures of my new favorite tank top, too. This perfectally mimics my absolute favorite RTW tank that I wore all Summer for about the last 9 years. It's plain, simple, and solid black and now it unfortunately has a hold near the bottom. Thank god I sew. <3
 
This is the Harbor Knot Tank Add On pattern from Striped Swallow Designs. It comes with the "knot version and a simple tank version.
 
 
I sewed the simple tank version and took off about 4 inches from the waist. (1" on each front and back side) Next time I'll only take off only about 3" or 3.5" to give me some breathing room. :)
 
 
If you can't already tell, it's certainly the fabric that makes this top special. This is the strike off print from Bare Necessities Fabric elephant print. This is a great weight, super stretchy cotton lycra that is perfect for all of you boho babes.

 
Bare Necessities Fabric is run by a great girl, Michelle McLeay. She's very active in her Facebook group, keeps customers updated and churns out amazing design ideas all the time. I really like that she has a nice mix of adult and child prints, too. Bare Necessities Fabric is run out of BC so all the prices are in CAD. You can snag a yard of this gorgeous elephant print for just over $20.


 I blended this with a lace back because I only had a FH to work with. I was able to squeeze out the front and some binding to match and paired it with this lace in bought in 2014! Scraps are amazing things.  

 
This is the second Harbor Knot Tank I've made in about 3 weeks. The last one actually had the knot on it and if you read my post, I said how the next one I was going to use binding. Here it is! I really love it with the binding the best. I cut the width of the neckline and armbands the same but attached RST without folding the bands in half. Once they were attached I just pressed the band under and sewed it down. So no modifications really, just a standard binding.

 
I pair it with my favorite RTW lacey bralette and I'm good to go. :)
 
Details
 
Preorder for this fabric ends Feb 26th so don't wait! She also has a TON of panels so be sure to check out the entire preorder here.
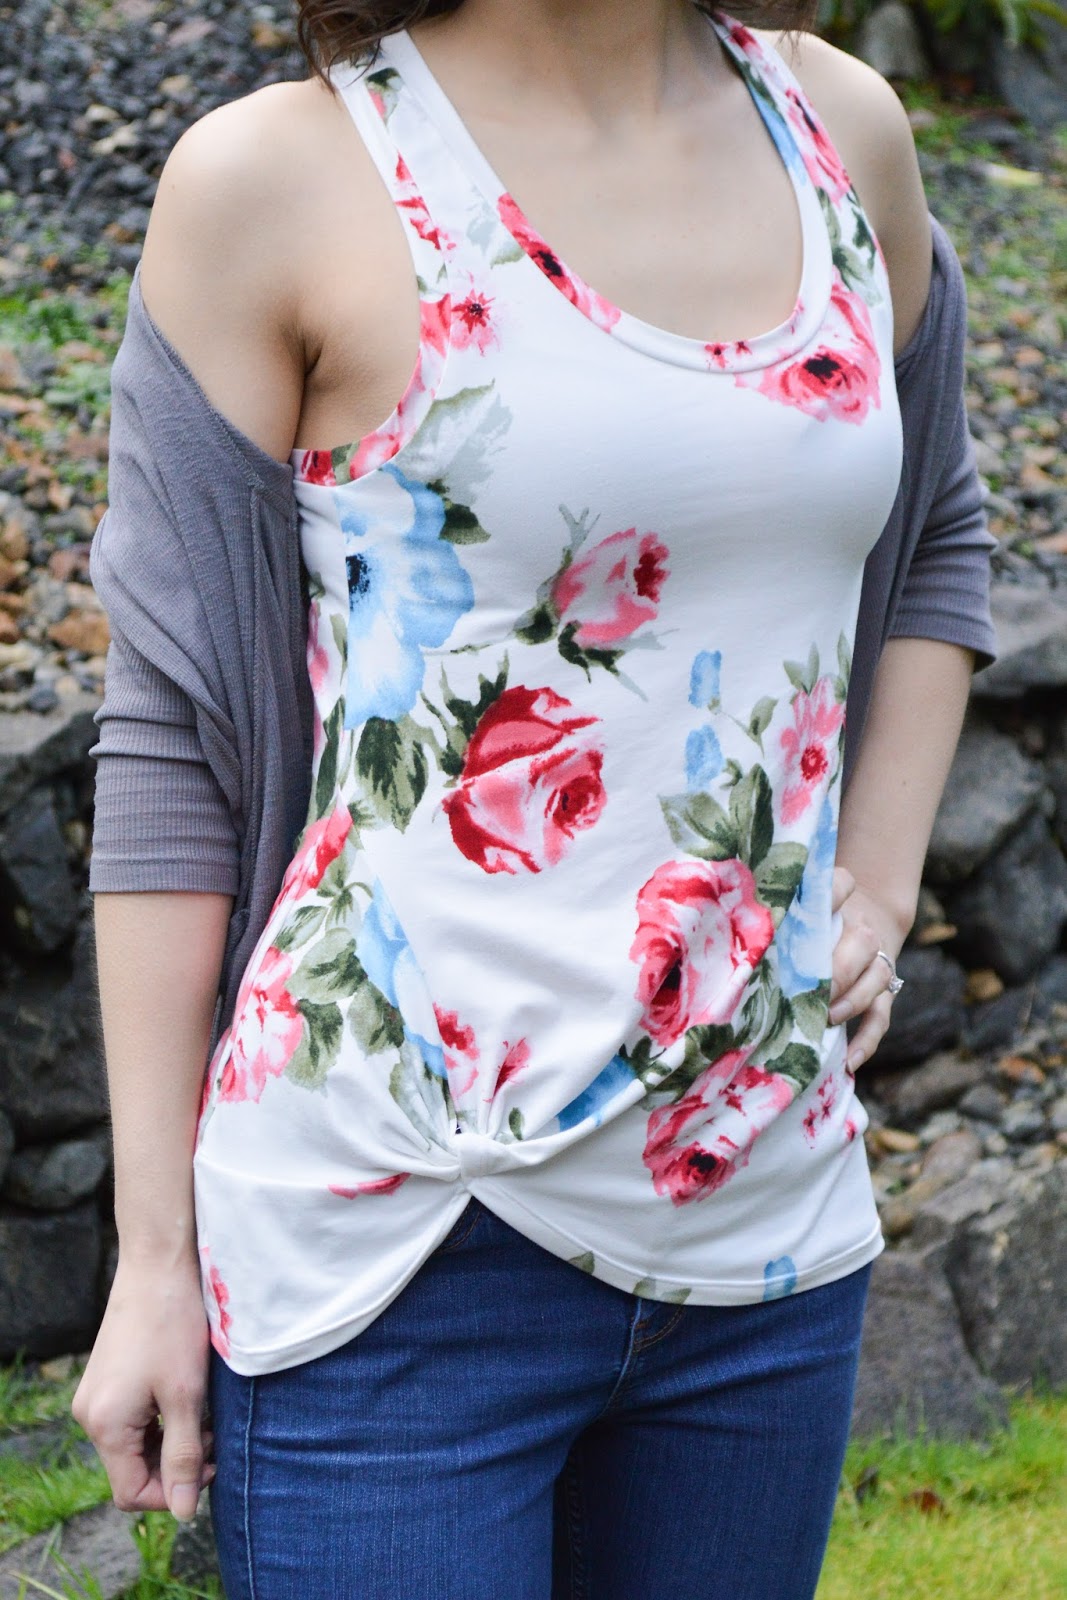
Hey friends! It's that a time again where I show off some more awesome Striped Swallow Designs! For my promo this month I chose the Harbor Knot Tank. The Harbor Knot Dress is already a favorite of mine. (And my husbands!) So I knew the Harbor Knot Tank would be a staple this coming Spring and Summer. Also, I've been dying to find a great racer back pattern since I found my favorite little black tank is developing a hole in it. I've owned it since I was 15 though... so I guess 10 years is a good life. Haha

I picked a really fun and floral double brushed poly from Simply By Ti Fabrics for this project. (If you like this floral, it also comes in navy! I'm sewing up a pair of jammies with it soon!) I only bought 1 yard but it was plenty for this quick tank. I sewed the low knot, slim fit, racer back tank in size XS according to my bust measurement and the sizing chart.

The Harbor Knot Tank is an add-on pattern for the Harbor Knot Tee. The best part about the tank is you can do a high knot/loose fit,
a low knot/slim fit,
a full tank back,
a racer tank back,
or a "simple tank" without the knot.
I was so excited to see that there was a racer back option because I've been searching left and right for a great pattern to recreate my favorite racer back but I didn't want to spend  $10 on a simple tank pattern yet still didn't feel comfortable enough creating it myself. I love the Harbor Knot Tank add-on because it has multiple options so you're not just paying for a simple racer back, you can make 5 different styles!

Spoiler alert. I'm only going to make one style though. Because that's how I roll. Racer back slim fit Harbor Knot is my entire life.


I made this tank like ten days ago and have worn it about 4 times already. Two of those times was to work! Nothing makes me feel better going to work than sporting a little me-made garment. In the middle of the sale I can always think to myself, 'If I can make this, I can do anything!' Helps boost the confidence. :) That's the other thing I love about this tank, it's pretty simple and quick! Add a cardigan and it becomes completely work appropriate. The knot is what makes it special, though, don't you think? It takes this otherwise casual tank to something special that can really be dressed up.


Although the weather is freezing here, I can't help but to plan some summer clothing, too. Thankful that layering is a thing! I can already tell I'll have 3 or 4 of these for 2018 and cycle out some of my less used RTW clothing.


I think for my next top I will create a binding rather than a 't-shirt' style neck and armholes. I like the binding look a little better. Feels like it dresses it up even more to me. Also, my favorite black racer back has bound armholes and neckline so I'll try to keep it as close to that as possible. :)


(Can you tell I'm freezing? It's like 35 degrees. It actually hailed right after this picture!)

I sewed this up in a quick 2 hours before work one morning. Once you get the knot part down it's a  really simple sew. Thankful to Mandalynn who created a video tutorial in the instructions so you don't have to guess!

Details
Size sewed XS

Make sure you check out the Striped Swallow Designs sewing group on Facebook where you can always receive 10% off your purchase and also check out Simply By Ti Fabrics for great deals and lightening fast shipping. :)

No affiliate links were used but I did receive the pattern and fabric for free both from separate ambassador programs with Striped Swallow Designs and Simply By Ti Fabrics.
 
Hey there, lovelies! Welcome to day 3 of the Sew, What Do I Wear? Vacation Edition tour! Made for Mermaids and Patterns for Pirates have been hosting these tours for a little while now and they're so fun to read, I'm excited to finally be a part of one. :D

It's almost Summer time! Is anyone traveling anywhere fun this Summer with their family? My husband and I are headed to Alaska for a quick trip to visit my sister and her boyfriend. They work in a tiny town named Talkeetna. I've spend a couple of Summers up there over the years but this time i'm excited to do touristy things and show Devin the town and Denali. We'll spend most of our time in little local breweries, by the river, and a few short hikes. The question always comes up, "What do I wear?" So, I sewed a few pieces to help get me started! 


First, I sewed up the Mama Isabel from Made for Mermaids. 


This is a simple wrap dress that sews up so quick! I mean quick. Like two-hours-from-printing-to-modeling quick. 


I sewed a combo of sizes Pink and Purple. (No I'm not having a stroke.) M4M does body positive sizing so they're all colors! Pink is a little smaller so the bust is pink, the waist / hips are purple. Honestly, because I used such a stretchy knit, I could have used all pink and have been just fine. :)


I chose a casual and cute bohemian feel, as we're just going to be doing "outdoor" events while we're vacationing. I wanted to blend in to the boho eclectic vibe that is Talkeetna.


This is just a close up to show off my new coverstitch serger combo! When my husband heard I wanted a new toy he said "why don't we go buy it?" So, that's the story of how I adopted a brand new Babylock Evolution! I'm a lucky lady. <3

  
For my final piece I sewed the Cross My Heart Cami from Patterns for Pirates. I've had my eye on this one for awhile. It's so Kyema and it's so trendy. I own several tanks that have this style so it's awesome that I can sew my own! I love P4P for that reason, Judy makes patterns that are in the stores NOW. 


I sewed a combo of the S and XS. Same as M4M, XS on the top and S on the waist. I should have sized up because I used my knit in the wrong direction. I just couldn't pass up that boarder print! It looks too cute. My intention was to wear the "V" in the front with the low cross, but I'll have to extend the "X" straps a little if I want to do that next time. Guess the "boobs" stretch a little more than the fabric. ;)


Washington weather is nothing if not predictably freezing and cold. Hence, the goosebumps. I really just wanted to show off my coverstitch ... and my new necklace from Katy at Thread & Grain! I love this thing to pieces! I wear it almost everyday and get asked about it all the time!


Everything sews up so smooth on a coverstitch! I am so in love!
If you're wondering where I got these cute fabrics, please check out Sincerely Rylee Fabrics. She carries gorgeous florals and most recently, trendy bohemian prints.

Both of these patterns will be sewed again! I hope you enjoy and please check out the Made for Mermaids blog to keep up with all the other gorgeous ladies' blogs who are sewing their vacation wear, too. :)


Hello from Sunny Washington! (Said no one ever.) Don't let these pictures fool you, I was freezing my butt off.

I'm bringing you something fun and new today, another bohemian beauty design from Mandalynn of Striped Swallow Designs. She recently came out with a girl's version of the Desert Breeze and I snatched it up right away for my nonexistent babies nieces. I absolutely adore the style of this top, it's going to be perfect for "Summer." (If that's a thing that happens here.) 


The Women's Desert Breeze includes several options.

-Flutter sleeves with cutout 
-Straight sleeves with cutout
-Flutter sleeves with cut out and elastic instead of binding
-Gathered waist dress
-Loose swing dress
-Loose swing top

-Fitted top (This will be an add on in the near future. A little birdie told me that it will be *free* to members of the Striped Swallow Designs Sewing Group! So join early and get first access to the add on slim fit top.)


I chose the slim fit with flutter sleeves and binding around the sleeves. Based off of full and upper bust measurements I sewed an XS and it fits like a glove. Full disclosure ... I feel like an angel. 
The construction of the Desert Breeze is ... a breeze. Everything comes together like a dream and it's relatively quick, too.

If you haven't used a Striped Swallow Design pattern before, you're in for a treat. Her patterns are laid out in a super pleasing manor and she thinks of the little things. (like putting the S/A on each page - so if you forget, which you know you probably will, you don't have to flip through 20 pages to find it.) She walks you through each step with detailed photos and at the end, you probably can't believe you finished with such an ace looking product. 
The binding instructions are great, too! Just look at how pretty my binding turned out in the picture above. I impressed myself. ;)
AND! The pattern pieces are layered so I was able to print just my size. #thankyoulawd

*Side note, I used a straight stitch for the binding and it turned out great! If anyone is like me, you might try to decide on stretch or straight stitch... we'll fret no more, straight works fine for this top on the binding.*


I did lengthen the Desert Breeze by 2". There are no lengthen and shorten lines, but it's pretty easy to do yourself. I just found the thinnest point on the front and back and cut and added 2" in between the pieces. If you are around my height 5'6", I would suggest adding a little length unless you are comfortable in shorter tops. Additionally, I haven't hemmed the sleeves or the bottom, so it's a little longer than it will be once I hem them!

The knit is a basic rayon spandex blend from Joann's. It's very drapey and buttery soft. I've always been a cotton lycra fan, but man, rayon has been winning me over lately. It cascades in a way that the cotton doesn't. I'm thankful that I couldn't find a print that I liked. I need to sew in more solids, this top feels so elegant in a cream. 


Thanks to my awesome fiance for the pictures (and necklace). I feel very delicate. :)

The Women's Desert Breeze is releasing today 03/28/2016! You can find it at StripedSwallowDesigns.com Women's Desert Breeze and Bundle and you can get it on sale with code "BREEZE" for 25% off (it's on the entire store, too!) I promise that it will be a Summer staple :D 

Details
Pattern Women's Desert Breeze $12
Fabric rayon spandex from Joann's $16 for 2 yards (with leftovers)
Notions thread $0.50

Total estimated cost $28.50

However I did receive the pattern free of charge in exchange for testing my size and I didn't use 2 yards of fabric. I probably have 3/4 yard left over.
It's Monday! I've got some good news for you ladies on the 9-5. Itch to Stitch came out with a new collection today and all the pieces are perfect for work! You can see the entire collection here. I tested the Zamora Blouse and I'll share some thoughts with you below and a million pictures. 


The Zamora Blouse is a deep cut Pussy Bow blouse with pin tucks and darts galore. It features gently gathered sleeves and cuffs, waist and bust darts, curved hem, and staggered pin tucks down the front. The buttons on the front are fully functioning because this is a fitted blouse. You may be able to slip it over your head, but most likely not. The design is fantastic and totally my aesthetic. It's slim fitted and low cut but still work appropriate. That's a win on all accounts for me. :) 


Here's a close up of the pin tucks on the front. There are 4 on each side. Pin tucks are a labor of love. But when treated with patience, damn. They look so nice! The instructions on this part are fantastic if you've never sewn them before. Kennis explains it very well! The top piece is staggered for each tuck and each fold lines up perfect after all the tucks are sewn in place.


I did struggle with the waist darts. I've sewn darts before but every dart I've sewn has been on the edge of the fabric in some capacity. The waist darts on the front and back are in the middle of the fabric which was a little more fiddly, but it really helped to create a fitted blouse and was totally worth the struggle. (Plus, great practice! I love getting new skills under my belt.)


I blended sizes to create my blouse. The pattern comes with sizes 00-20. Based on my measurements, I sewed a size 0 for the waist 27" - size 2 for the bust 34" - and size 4 for the hips 37", and a B cup. Blending these sizes was easy because the Zamora features layers, so I just printed the three sizes I needed and gradually blended them together as I cut the paper out. The fit feels fantastic. There are some visible drag lines under my bust. Unfortunately I'm not experienced enough to know what caused this or how I can fix it. So I'll be doing some research!


The back has a small pleat and two darts at the waist. I meant to photograph the inside of my blouse, too. Unfortunately I forgot but I did do french seams, so the inside is pretty neat, too.


Note to self: Read. This pattern comes with cup sizes, so if you are a C cup and a size 6, you'll sew a different size than if you're a B cup and a size 6. It's pretty fantastic and helps to customize your fit without a ton of modifications you have to do yourself. All this being said - there a lot of pages to print that you don't need (you only need your size / cup size) Kennis provides a print chart on page 5 to tell you what pages you need to print according to your cup size, then you can choose to use the layers function and only print your specific size.
Can you guess already? Yep. I printed every page and pieced them all together before I realized that I was taping together a D cup. So not my chest size. :) So, check out page 5 before you print! You're welcome. :)


This is my "I'll totally answer the phone and do professional office work, but I'll also probably wink at you." Outfit. It got second glances from the fiance... which is saying something if he's immersed in League of Legends. 


Here's my lay flat picture. So adorable! Can I confess that I actually hate this fabric. I love the buttons, but the fabric is bleh. Blue is just not my color, yet somehow I own a TON of blue. Fabric aside, I love my blouse. I will be making more for work! I actually wore it for work today and got a ton of compliments. 


This is a little less test related but more ... "I got my new sewing machine!!!" related. JUST LOOK AT THESE BUTTON HOLES! HOLY CRAP! It was such a breeze to sew these button holes. No muss, no fuss. I even did extra buttons because I picked up a smaller size. (Hey, they matched so well!) That's pretty unheard of though, amirite? Extra button holes by choice? Yes, I have lost my mind. Directly into my Janome Skyline S7.

 YAAASSSS!

I loved sewing the Zamora blouse. It was a total labor of love. I believe I spend about 6 hours on this blouse alone. I opted to do french seams as my fabric was so prone to fray. All the darts and pin tucks took time, however - wasn't it totally worth it? I am super proud of this blouse and I can't wait to have a collection of them. I believe Kennis puts a ton of work into her patterns to make them impeccable.
There is everything you'd expect in a professional pattern, grain lines, notches, (I believe it's called trueing? When all the folds for the pin tucks make a straight line when they're sewn?), cup sizes, encased neckline and cuffs, drawn instructions, clear directions, layer printing, printing layout, tips for new techniques, and a classic design.

If you are interested in the Zamora Blouse, you can get it here.
The new releases and entire shop is on sale through March 13th, 2016 with code 4releases

Details
Fabric: Clearance at Hobby Lobby Fall 2014. 2 yards $12
Notions
Buttons: $.99
Thread: $.50

Estimated total cost $25.49

I received the Zamora Blouse pattern for free in exchange for testing it.