Friends, I need to ask a question -  have you ever asked your tshirt, "why are you trying to kill my armpits?" No? Well then you need to give me your tshirt pattern, because I definitely have asked myself that at least twice this week. I'm not very good at sewing things more than once. It's rough on my wallet - but it's so rough on my brain to sew the same thing again and again, but I'm definitely getting better at it. This week I sewed up the Nettie pattern from Closet Case Files as a tshirt twice, neither of which I could consider "successful."

So let's take a look.

The first time I used some heathered cotton/lyrica knit and cut the pattern exactly at the "hip" line, where the "shirt" part turns it into a body suit. Well, do I need to explain more? Obviously I like my shirts longer than JUST touching my pants. Too bad I didn't think about this when I was cutting. So the issues here are:

1. Much too short. (With a waist skirt it would be okay)
2. The arms eating my armpits.


In all honesty, it doesn't look TERRIBLE. But I'm not really pro - "let my belly hang out when I'm not wearing a crop top" look. It's just not for me, folks. But dang, I love that neckline! Gorgeous. :)


(Secondly, I guess I've been practicing my bitch face. What is that even? I mean seriously, that is simply my face. Except, I look as if I want to murder someone. Astounding. Don't worry, I already know what you're thinking, I wouldn't be friends with me either.)


See the puckering on the shoulders from the sleeves being too close together? My back needs more room, yo.  


Here's a picture of my armpit; you're welcome. 
See how far jammed up it is? I need a sleeve fix.

So after this one, I thought ... only two things I need to fix, not that bad. I decided to cut and trace a second one. I used some darker grey fabric from the same purchase lot as the previous shirt and assumed it was a cotton/lyrica blend.... you'd think by 23 I'd know what assuming does. Anyway, it doesn't have lyrica in it so it was MUCH too tight. It still "fits" in that "sausage being made" kind of way, but it's just not.... what's the word.... comfortable. 

This time I modified it by adding 3" to the length of the shirt and cutting the size 10 sleeves and the armcye to give my arms some moving area. 


So here's the kicker - the arms are still too tight. HA! I realized afterwards that the actual underarm of the armcye is far to high for my liking as a tshirt. Also, even thought I traced the armcye and sleeve the same size... they didn't really line up that well with the body of the shirt so it made a weird pucker under my arm. 


That's my "this is not pleasing" face. Whomp, whomp. I didn't even hem it cause it's being trashed. :( Scratchy fabric is scratchy.


 I'm just moving on guys. In my quest for the perfect tshirt,  I have a feeling that >this< isn't the one. Though I do swoon over that neckline. Wowza! (can I say that? I just did.) I be like, daaayyyyum gurl. (just kidding, I don't ever "be like that.") I'm really thinking that I'll try the Patterns for Pirates Layer Me Up and use the Nettie Neckline. Mash up! :P

(Did I somehow forget to mention that isn't isn't intended to be a shirt? Brilliant! It's really a pattern for a body suit which I'll be making once I figure out how to fit my odd arms/back area.)

Have you found your perfect tshirt pattern? Tell me what it is! I like tight fitted, scoop necks, but I don't snub my nose at a v-neck either. :)

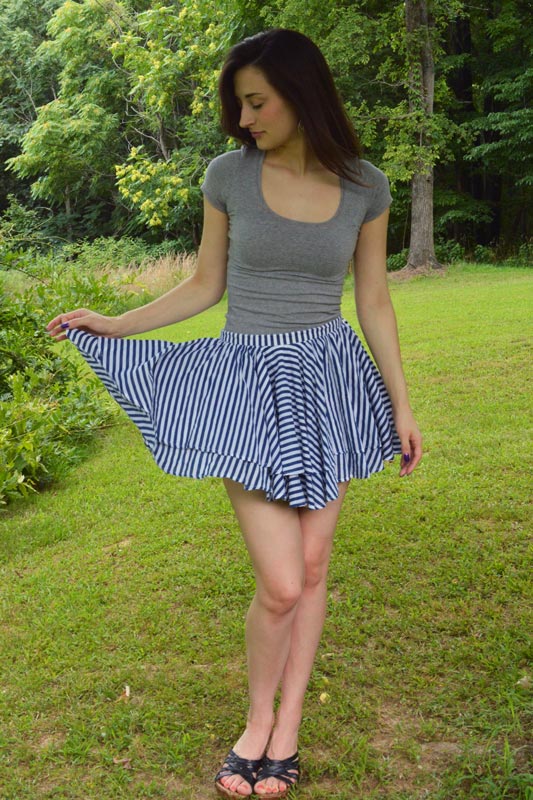
Here is me trying to make this shirt work with a waist high skirt. I think I like it okay, covers that it's too short. ;)

Details:
Fabric: Version 1: Light gray cotton/lyrica knit $6.50/yard for 1 yard =$6.50
Version 2: Dark gray, some kind of cotton blend knit $6.50/yard for 1 yard=$6.50
Notions: Thread $.50/shirt for 2 shirts=$1.00
Clear elastic $.25/shirt for 2 shirts=$.50
Total estimated cost: Each shirt $7.25 
Do you ever see a trend and think "That is not for me." Welcome to UGG boots, trucker hats, and rompers. (I've never once desired to look like an adult baby.) but these trends - not those specifically mentioned above - they seem to look endlessly chic on other blogger babes. I can't get over it! How DO they do it?! The kimono was this trend for me. Yikes, won't I look like I'm stepping out in a robe or a beach cover up? Won't I look like I'm trying to be female Huge Hefner? Well, the short answer is no, but I'm not interested in short answers around here. ;)

The lovely pattern I'm testing today is from Striped Swallow Designs by Mandalynn (How awesome is her name?!). Her designs are very boho, flowy, and completely on trend. You just want to be on the beach while wearing her designs, guess it should come as no surprise then that she hails from Florida. /Jealous! Also, just as a general rule, Mandalynn's patterns are very visually pleasing. They are formatted professionally and logically organized. She always includes helpful tips like the seam allowance at the end of each page so no more searching for it. I'm not sure exactly how to explain it, but her pdfs make me feel very ... pampered. (In the best way possible! They look fancy, not homemade - It's like a luxury item, not pampered as in they "baby" you.)

I tested her newest design The Wildflower Kimono, this totally brought the kimono trend into reach for me. I decided to apply after seeing Mandalyn's version on the cover, it just looked so great on her! Lucky for me, I was picked as a tester, so let me share some thoughts ...


First! I totally gave my fiance hell over these photos. Somehow I thought they were all blurry and unusable, but hello awesome photos! He told me "you're just too hard on yourself, you look great!" and I took a second look and he was right. I'm an ass. Bless him for his patience. Haha


This kimono is so wispy and light and amazing! As far as the actual pattern, well, it's not a "pattern" per se, but more of a tutorial as there are no pattern pieces to print. The instructions are clearly written and the pattern comes in sizes Newborn to ladies 3X. BANG! <--That's for your buck.


The Kimono is comprised of only three pieces (including arm bands not pictured here) and has some gorgeous gathering details on the sleeves. It has some good rear end coverage as it dips down below your butt so you're wrapped up in a cocoon style. It's an "always open" kind of kimono that still shows off your shirt, which I love!

Ahh. To go on vacation and sip margaritas on the beach in Florida in some area with loose liquor laws. Yes please. Isn't this how these kimono pictures make you feel? 


I sewed the Wildflower Kimono up in about 2 hours. The only part for me that was frustrating was my fabric choice. Chiffon, you beautiful monster. I tried to do a rolled hem on the sleeves, but connecting those when you reach the end of the circle is impossible for me. (Sleeve cuffs were added to the pattern after I sewed this one up. I'll be using those for my next one!)


Here is me having fun like they do in commercials. It was exhilarating.

This was one of those trends that completely had me stumped. I thought, no kimono, you are not for me. Alas, I was wrong and I completely fell in love with it! (So did my mom, I think she wants this one. :)

I already have fabric for two more.... it was on sale. :P

You can purchase The Wildflower Kimono here for $9

Details:
Fabric: Simply Silky Prints Chiffon from Joann's $6.49/yard for 1.75/yards with coupon = $11.36
Notions: Thread = $.50
Total cost: $11.86
Another week, another test! Testing really motivates me to sew. I work well with deadlines. (and by work well I mean I cry my entire way through it. College flashbacks! D: ) Lucky for me, pattern testing is a fun kind of deadline with an awesome prize at the end and a real feeling of success.

I've been really into sewing active wear lately. Like, REALLY into it. Just ask Nick how long I've been promising to make him a pair of underwear. That would be a good estimation as to how long I've been putting off sewing other things in my queue in favor of sewing active wear. So when Angelyn Bennett of GreenStyle Creations posted a tester call, I was all over it! 

GreenStyle is a PDF pattern company that offers men, women, and children's patterns and all are very comfortable, "everyday" fashion designs. I'm super thankful that Angelyn is also on the workout sewing train, her second most recent pattern is the Jillian Tank, which i'm still in serious need of. #BuyAllThePatterns

**As compensation for testing I did receive the final pattern free of charge, though all opinions are my own. :) 

The Inspire Tights  is the pattern that I tested. They are workout leggings with a couple of awesome features that really make these active wear rather than normal leggings. They feature an option gusset, secret waistband pocket for a key, and several design features to use separate fabrics so they can look like your favorite store bought pair. They also have clear elastic at the waist so you won't show crack while you're re-wracking your weights or doing the Pigeon Pose. You can make them shorts, capris, midi or full length - hello winter running! (Just kidding, I never run in the winter.)


Here was my first pair. I sewed up the simplest option, capri length, no pocket option because it hadn't been added yet, with the optional gusset. (Always do the gusset gals, always do the gusset.) At first the gusset instructions were difficult for me to understand and a couple of testers mentioned it so Angelyn beefed up the illustration and now it's really simple! Yusss for incorporating feedback! <3

 I was trying my hand at the Peggy Bundy look. How did I do?


That double flower at the waistband is KILLING my eyes. It's killing them. It's the kind of thing you notice right away, unless you're sewing it. -_-


Here's me pretending I have muscles with my smuggest mug on. Don't be jealous disgusted, that's not a misshapen muscle, it's just a comfortably dislocated shoulder. 


and here is to demonstrate my athletic prowess. -_- I totally kicked up to a handstand and didn't rip my tights cause of that kick ass gusset. My new slogan, Just Sew It. Yeah, that's right, i'm talking to you Nike. I'ma do it better.  


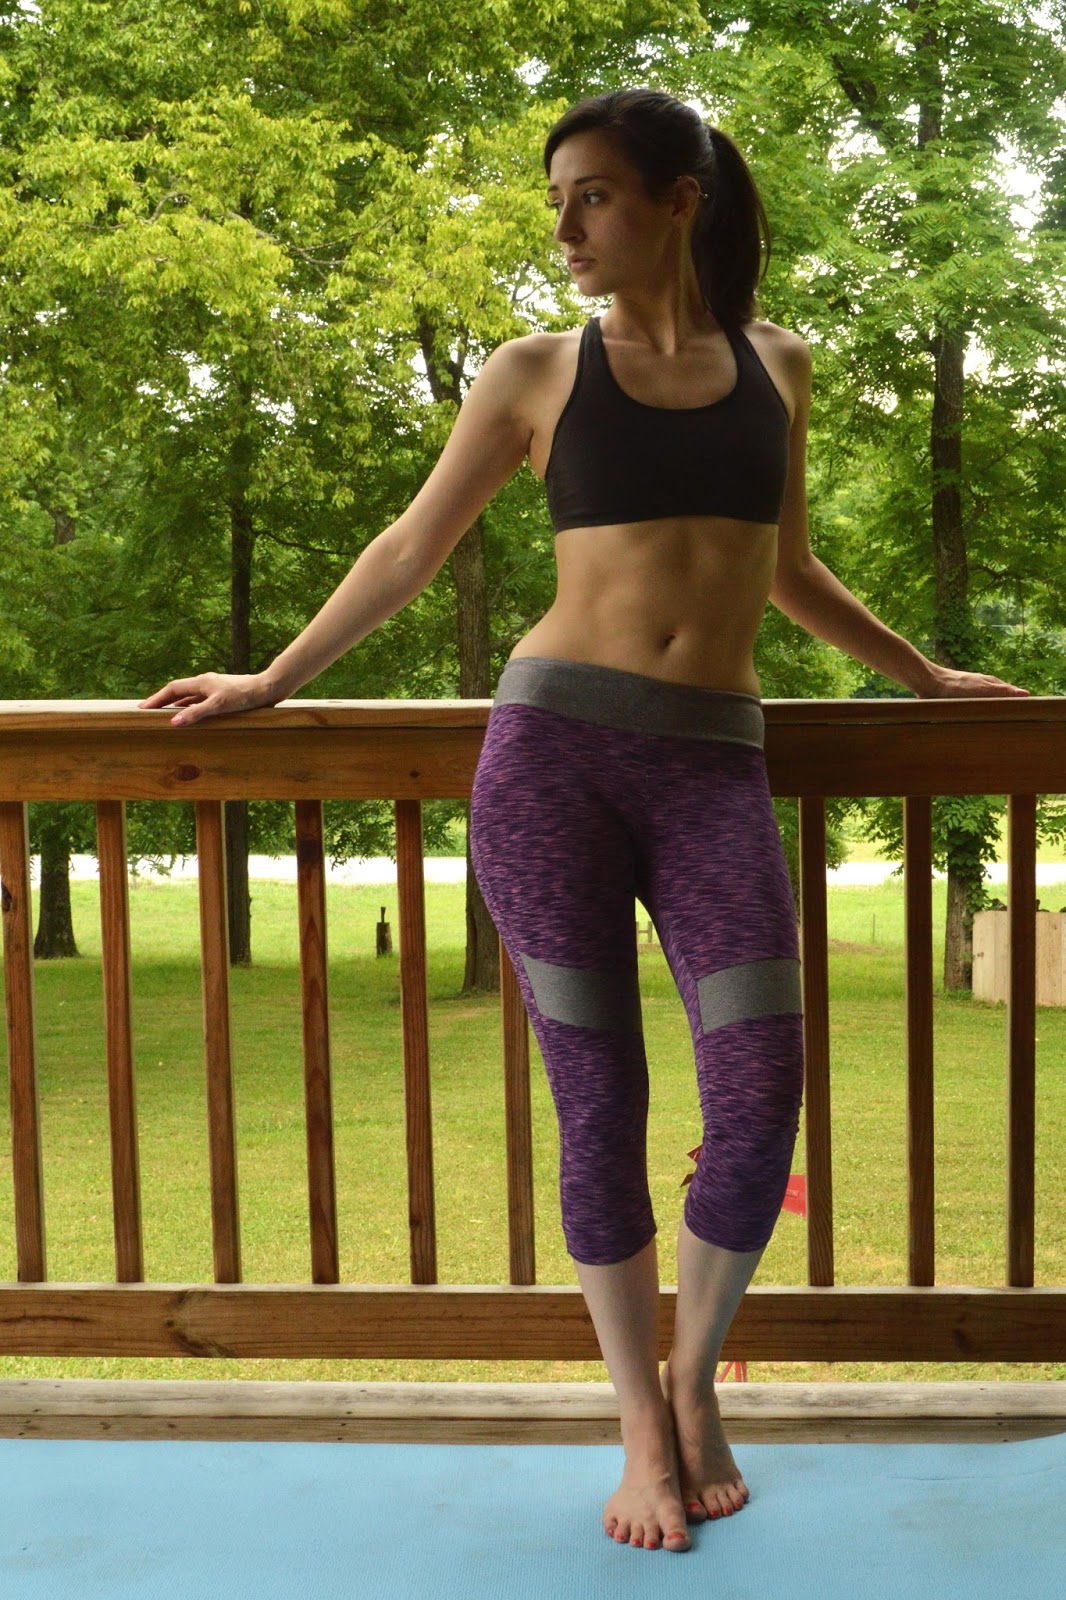
For my second pair I sewed these up using this purple performance knit from Joann's. It is extra stretchy, honestly, these could comfortably reach my ankles. It's that stretchy. 
For these I did capri length again, optional gusset, waistband pocket, and angled front inserts for fashion reasons. :P 
*Side note, did you click the pattern link yet? No? Do it already! This picture made it to the cover of the pattern and it made my freaking year! How cool is that?* I was super starry eyed. :)

'

And here I am being all matchy matchy with my Inspire Tights and SUAT Brazi. (I'll save that for another post) I am so ready for acrobats or yoga or Netflix! Whatever life throws at me!

This pattern was really simple to sew and I'm absolutely loving it for my workout tights. Something that I wanted to mention is that Angelyn is so receptive to tester feedback, it was really awesome to work with her. This was tested and tested until it came out perfect. The instructions are simple, construction is straight forward and they really didn't fail on the "inspire" aspect. They are so comfortable, it makes me want to hit the yoga mat twice as hard, especially because you can customize with freaking awesome fabrics that make working out even more fun. They are comfy, stretchy, and feel really secure. I don't worry about ripping at the cheeks...(if you know what I mean, because I'm being super subtle.) I can't wait to make a ton more of these, I'll be the envy of all my cats while I yoga in the living room. 

Details:
Version 1, Peggy Bundy
Fabric: Rayon/Spandex from Joann's - I would use something a little stretchier next time
Notions: 3/8" clear elastic
Price: Fabric - 1 yard at $5/yard = $5. Elastic $1. Thread $.50 = $6.50.

Version 2, Purple and Gray
Fabric: Purple and gray is Performance knit from Joann's
Notions: 3/8" clear elastic
Price: 1.25 yards (combined) at $12/yard = $15. Elastic $1. Thread $.50 = $16.50.
Though it's been a short time since I've been sewing, I've been lucky enough to be chosen as a tester for some pretty awesome designers which I will be featuring  in the coming weeks. I think where I contribute most is by being newer, I studiously follow directions, identify areas that are hard for beginners to understand, test fit for my size and, unfortunately, nit-pick about grammar. ;) (Which is hilarious because i'm a terrible speller, thank god for auto-correct!) 

Most recently I was testing a pair of knit pants for Patterns for Pirates designed by Judy Hale. The idea behind the SOS Knit Pants is that they can be Skinny or Straight, jeggings or work wear, date night or office attire. You get the idea.  I sewed up the straight leg version seeing as i'm part of an office...
Judy designs some of my favorite patterns, (which I feel are really under-represented in the blogging world but very celebrated on Facebook, can't we  just merge the two already?) her style is very modern, RTW, comfortable, wearable styles for ladies. Sometimes I feel like it's hard to get all those in one designer! Also, her PDF's are no trim pages. Hallelujah! As compensation for testing this pattern, I did receive the final pattern for free, though all opinions are my own. :)

This is my second pair, and my first successful pair, of the SOS Knit Pants. Let me start off by saying THESE ARE SO DAMN COMFORTABLE! It's like i'm wearing secret pajamas to work. Seriously, it's my favorite secret. I work at an office currently and I have to sit down all damn day and these treat my belly to a soft hug for 8 hours.


 In the first round of testing, the waist was really high but by the end of the pattern, it had been lowered to the perfect height. I mean, right? That rise is simply perfection. 


(but what is up with those pockets?) 


One thing that bothered me about these is no matter the material I used, I was always able to see the pockets! I guess that's the price you pay for comfy knit pants. It really wasn't nearly as noticeable when my shirt was down. (Obviously I wear my shirt up like this at work.) I even trimmed down the pockets and they were still visible. Next time I'll probably do faux pockets on the front to eliminate that.


Here I am standing in front of a bush looking lackadaisical... 
Something I really liked about all this pattern is it has TONS of top stitching details to make the pants go from homemade to handmade. Unfortunately for me, I don't have a cover stitch machine yet so this meant I had to change from double to single needle about 15 times.... one more reason I need a second machine. ;) in the end though it was totally worth it. My fiance even commented how he never would have guessed they weren't store bought because they looked so "professional." Winnnnn.


My first pair was a little..... less successful. This blog is about progress, so I'm going to share anyways! The pictures were taken moments before a torrential downpour, so excuse the vampire flash skin. 


*Toss on my nice jacket, brush off my shoulders* I was SO excited I had sewn pants! 


And they fit awesomely! I did remove about an inch from the rise. (This was lowered an inch in the final pattern, so it's about accurate.) I posted pictures, feeling pretty proud... then Judy informed me that I had sewn the yoke in backwards.... how does one even do this?! In case you're wondering, yes, I have seen pants before, I promise. 


Yes. Backwards. 
*Side note, if you want to feel awkward, go outside in front of your neighbors while it's lightning and thundering and ask your fiance to take closeups of you butt while you are strangely overdressed for 6pm on a Wednesday.


See those visible pockets? Somebody halp! Thinner knit? Faux pocket?


I'm so happy that I sewed up a second pair. Much more wearable. The first pair was also done in a active wear fabric and was much thinner than anticipated. Why does my local Joann's have cornflower blue and camel ponte but not black? Go home Joann's, you're drunk. 

I really want to sew up more of these in many other colors ... you know, more black and maybe some gray. All the pretty office colors. 

If you're interested in purchasing this pattern you can find it here for $8.
If you want to see more pics from other testers you can find those in Judy's Facebook group!

Details
Size: S
Fabric: Black suiting from Joann's, scrap cotton / lyrica for waistband 
Notions: 1" elastic
Price: 12.99/yard - on sale 50% off at 1.5 yards = $9.25ish, elastic: $1. Thread $.50 Total price = $10.75
Alterations: None 
Hey friends! I'm Kyema - as a rough translation it means spontaneous female, or a cry out to the heavens, it's an exclamation of sorrow or maybe one of great joy. Oh! Either is fine with me.

I suppose this blog is about making. As the internet would call it these days, i'm a maker, a sewer.... no, no, no.... let me clarify. A sew-er, a sewist, a seamstress, and maybe one day a tailor and dressmaker. I'm working on cultivating my craft, whatever craft that it may be at any particular moment.

I received my first sewing machine at twenty. It was a birthday/associate graduation present from my mom after I had asked and asked, she bought it for me, fully expecting it to never be used. I sewed up a few projects in the Summer of 2012 but when school started again, sewing got tossed on the back burner and I've only seriously started sewing in September of 2014 - that puts me at about nine months at present! I could have grown an entire baby in the time I've been sewing. To summarize, not very long. Though I've accomplished a ton in my mind! My first indie pattern was purchased from Violette Field Threads back in October and by April I was sewing up a test pattern for them and my photographs even made it into the pattern! Since, I've taken sewing lessons from the acclaimed Lladybird, purchased and learned to use a serger, tackled French seams, tricky knits, neck bands, and successfully tested for multiple pattern designers, and most recently sewn a pair of pants! (not jeans yet, calm down.) ... and other things that seemed hard at first, but with tons of internet help and tutorials, I've been able to tackle. I hope that one day my blog can serve the same purpose, to help and inspire, or at least be an entertaining scroll for some bored sewist at work.

In any case, I've had blogger burn out before (separate hobby) - so this blog is literally just for fun and to document my personal journey of sewing/making (I include making, because i'm naturally crafty-inclined and feel the need to try new things often, so from time to time you will be seeing other crafts on here!). When I am so close to something that I see it everyday, it's so hard for me to see improvements. It's easier if I have a visual reference to see which techniques are improving and which need work and to identify my overall sewing progress. Though the blog is still under construction, so bear with me as I work on some technical difficulties. :)

So this is it - This is me. Kyema! And the Art of Oh is born.